The kitchen sink cutout size refers to the amount of space you need to install a sink. Here is a guide for how to measure kitchen sink cutout size.
Essentially, the space you cut out should be enough to accommodate a sink without being too tight or too loose.
Usually, the kitchen sink cutout size depends on the type of sink you intend to install. For example, overmount sinks, which need to sit on the countertop, need a slightly smaller cutout size than their undermount counterparts.
With a typical kitchen sink measuring 18 x 18 x 12 inches or more, you need to be sure that you have enough space for your project.
Keep reading and learn more about measuring the right size for a kitchen sink cutout.
How to Measure Kitchen Sink Cutout Size

Measuring a standard kitchen sink cutout size is a straightforward process, especially if you know what to look for. It usually depends on whether you intend to install an undermount or overmount sink.
Accurate measurement of a sink cutout makes it possible for you to install the sink. Besides, kitchen sinks are expensive, and breaking one during installation can be costly.
Getting the correct kitchen sink measurements requires you to have the right tools. The proper combination of tools for this task includes a straight ruler, measuring tape, pencil, and paper. Here is a step-by-step guide on how to measure sink cut out the right way:
Step 1: Measuring the Depth of the Sink
For this step, you can use a ruler or measuring tape. Measure the depth of the old sink so that you can compare it with the new one.
Once you get a perfect match in the sink depth, you can be sure you’ll have a breeze during sink installation.
Step 2: Measuring the Length of the Sink
Now that you know how deep your new sink should be, you should measure the length. Place a tape measure or ruler end-to-end above the sink and do the readings.
This measurement indicated how long your new sink should fit perfectly in place of the old one. The length of the sink should cover the cutout area plus an allowance for overmount or undermount placement.
Step 3: Determining the Width of the Sink
One of the most important considerations in sink installation or replacement is its width. It is the shortest length from one end of the sink to the other and is measured from the top hem.
Put a tape or ruler in place and do the reading. After measuring the kitchen sink width, write the measurements on the piece of paper
Step 4: Get the Width of the Top Hem of the Sink
The hem of the kitchen sink usually has a bigger width than the lower portion. Getting the exact measurement makes it easier for you to install top-mount or drop-in sinks.
For undermount sinks, that measurement isn’t important. You may want to uninstall the old sink before measuring the width from edge to edge.
You need to match this measurement with the kitchen sink cutout size. After removing the sink, you can measure the cutout from the top.
Otherwise, it would help if you went under the sink to measure a kitchen sink. Make sure to get the kitchen sink height right.
Step 5: Measure the Length of Countertop Space
If you’re renovating your kitchen, take time to remove the old sink. As you do it, avoid damaging the countertop. If you need help, ask someone to give you a hand. Place the tape or ruler along with the cutout and write down the reading.
After that, place the take across the sink and take note of the measurements. You may want to hold one end of the tape while your friend has the other.
Step 6: Measure the Width of the Countertop Space
Over-mount sinks are usually attached to the countertop at their hems. Therefore, it’s not enough to measure the length and width of the cutout. Extend a little further than the edges of the cutout to find out the exact area you need to install the new sink.
Please take note of the measurements so that you can use them when purchasing the new sink. If the sink is too wide, it won’t fit into the cutout. On the other hand, a sink with a width that’s too small can’t hold tightly after installation.
Standard Kitchen Sink Cutout Sizes
The exercise above aims to get the right kitchen sink cutout dimension. Even though you might not have an outright kitchen sink cutout template, you should have a rough idea of what to expect.
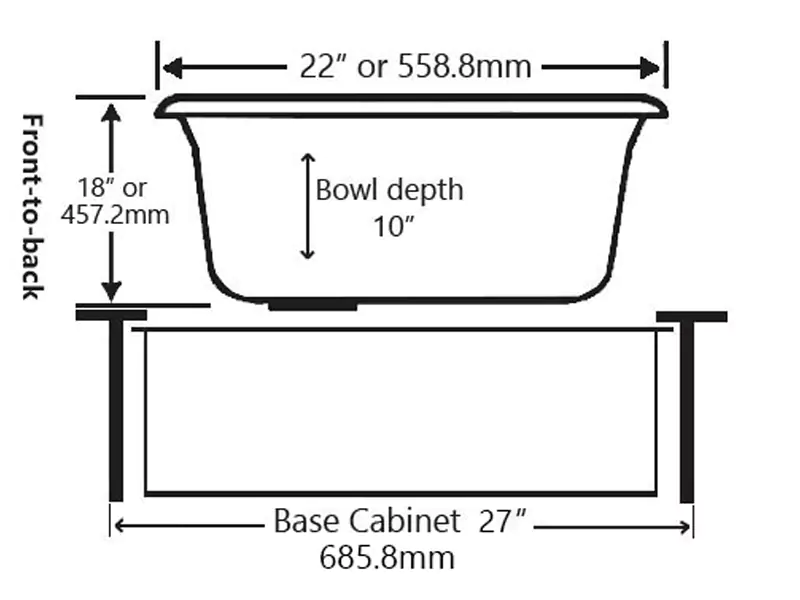
Typical kitchen sinks measure 18 x 18 x 12 inches or more. A kitchen sink could have up to two compartments in a household setting. Such as sink can measure up to 36 inches.
Since you used a ruler to get the measurements, you might have them in centimeters and not inches. In that case, sink cutout dimensions in cm will be at least 46cm x 46cm x 31cm. Be sure to record your measurements to make it easier for the store owner to give you the right sink.
Finally, you can measure the dimensions in millimeters. In that case, the sink cutout dimensions in mm will be 460mm x 460mm by 310mm.
Converting the measurements to millimeters improves the accuracy levels, helping you get it right from the get-go.
Despite the existence of standard sizes for kitchen sinks, the most important consideration when deciding the size of a sink is the size of your kitchen.
A large kitchen may require a large bowl kitchen sink, while a small kitchen will do a smaller one.
Why Do You Need to Know Kitchen Sink Cutout Size?
Your kitchen sink cutout size determines the size and type of sink you can install. You can select an appropriate sink once you know how large the kitchen sink cutout is.
For instance, undermount sink sizes would need to be a little larger than the cutout you make. That’s because you have to install it below the countertop level.
On the other hand, an overmount sink requires installation onto the countertop. The overlapping sections of the sink create a ridge over the counter.
Therefore, the cutout should be slightly smaller than the sink. Thus, knowing kitchen sink cutout dimensions help you choose the right kitchen sink type and size.
How to Create a Sink Cutout Template
Step 1: Start with the right material
The best material to use in creating a sink cutout template is Luan wood strips. However, particleboard and plywood can also be used to create a fine template. Using cardboard, tape, paper, or heavy wood to create a template is not ideal because they are flimsy, and they can easily get soaked through water while creating a template on them. Also heavy wood is too heavy for this type of project.
Step 2: Drill two starter holes in opposite corners just inside the cutting line
Use a spade and drill bit to drill directly into the laminate and the substrate. Do not worry if you have a rough cut edge. The sink rim will easily cover it.
Step 3: Insert the saw blade into the starting hole and align the blade exactly along the cut line
If the backsplash is interfering with the saw blade and preventing you from creating the cutout, turnover the countertop so that you can complete the cutout from the underside.
Step 4: Slowly cut through the line
You should be careful and not rush in this stage, and allow the jigsaw to do a perfect job. Again do not worry about the little chips that will likely occur, as they will be covered by the sink rim. To ensure a clean-cut, have an assistant hold the cutting area to prevent the piece from falling and the saw blade snagging. Ensure your assistant is wearing thick gloves and eye protection
How to Measure Under-mount Kitchen Sink Size
It is very easy to measure an under-mount kitchen sink, and it only takes a few minutes to do it. You must have the measurement for the following dimensions to describe the actual size of the under-mount sink you want to install.
Step 1: Measure the length
Place a measuring tape along the kitchen sink length. Ensure you measure both edges, to cover the sink length. It is recommended to record all measurements for future purposes.
Step 2: Measure the width
Place a measuring tape at the sink back edge and slide it forward so you can measure its width. Ensure the tape is properly aligned with the kitchen tap and extend it over the sink to the exact edge where you are standing.
Step 3: Measure the depth
Extend the measurement from the top of the sink to the bottom.
Step 4: Measure the sink rim
Since the under-mount kitchen sink is designed to hang below the countertop, you won’t be seeing the sink rim. Thus, in this step, you must remove the kitchen sink from the countertop so that you can measure the sink lip dimension. Although most of the sink rims are measured 1 inch in diameter, you should still measure them yourself.
Step 5: Measure your counter hole length and width
You must make this measurement if you plan to replace or change your old under-mount sink. Ensure you switch off the water valve and disconnect the drain line before removing your old under-mount sink. After you have done that, measure the counter hole length and width.
Step 6: Measure the cabinet opening width
If there is a cabinet below the countertop, then you must measure the width before buying your under-mount sink. Crawl beneath the countertop and place your measuring tape and start measuring from the top left corner to the top right corner of the cabinet. This measurement is necessary because an under-mount sink wider than the width of the cabinet won’t fit in.
The Standard Kitchen Sink Cut Out Size
A standard kitchen sink is 30 to 33 inches long, and 10 inches deep.
Standard height of a Kitchen sink
The height of the kitchen sink can vary by up to 10 inches, between 29 and 39 inches in height, depending on the person’s height at home. The average kitchen countertop with a built-in sink is about 36 inches in height.
The depth of a Kitchen sink
Most of the kitchen sinks are between 8 and 10 inches deep. Although a sink that is 10-inches deep makes it easy to submerge pots and plates, a deeper sink won’t be comfortable for a short family member. Thus, a shallow basin allows easier reach.
When determining the depth of a sink, know that a standard under-mount sink sits almost 2 inches lower than a drop-in sink, however this will make it more difficult to reach the bottom of the sink.
The undermount kitchen sink rough-in dimensions
Drain discharge hole
Approximate rough-in dimensions for installing kitchen sink drain outlets are 16 to 20 inches from the floor. However, the height depends on the manufacturer of the sink or kitchen planner’s manual. In this case, if an error occurs, the drain pipe will not work.
Sink supply lines
The supply line requires two holes. The water supply pipe should be 2 to 4 inches above the drainpipe, and the horizontal hot and cold water pipes should be 4 inches from the sink centerline.
Sink fixtures
The recommended support size is 20 inches from the centerline. There should be a minimum distance of 30 inches at the nearest obstruction at the front buffer.
Sink placement
The sink should be 31 inches from the floor. These are measurements from the bottom edge of the sink to the floor.
Conclusion
Installing a new kitchen sink or replacing an old one shouldn’t be difficult, even for the uninitiated. So long as you have the right tools and take the correct steps, you can get the accurate measurements and use them when purchasing a new undermount sink.
You can get the kitchen sink cutout size by measuring either a tape measure or ruler. The tape measure will give you measurements both in inches and centimeters. A ruler will do the trick if you want your measurements exclusively in centimeters or millimeters.
Follow the steps above to get the right kitchen sink cutout size.