Need to know how to remove flow restrictor from Delta kitchen faucet? Here is our complete guide and what you need to do.
A good quality flow restrictor can help to avoid several plumbing issues like unnecessary pipe breakage.
But while helping to manage water pressure, it often gets blocked with debris. When this happens, water flow through faucets becomes ridiculously slow.
Do Delta Kitchen Faucets Have Water Restrictors?
The answer to this question largely depends on when the kitchen faucet was manufactured. The EPA Code of 1994 mandates manufacturers of plumbing appliances to ensure water conservation in all their designs.
So, most kitchen faucets produced after this law was passed have flow restrictors. However, if your kitchen faucet was installed before 1994, which is not likely to be the case, there’s a big chance that it is without a water restrictor.
All the same, there are a few recently-manufactured faucets that are without flow restrictors. In this case, the usual practice is to install the restrictor as an additional part to replace the conventional flow-directing screen on such faucets.
Where is the Flow Restrictor in a Delta Kitchen Faucet?
Like every other type of kitchen faucet, a flow restrictor in a Delta kitchen faucet is located in the aerator. The aerator is that part of a faucet that is screwed into the spout end.
Generally, for all faucets – whether in the kitchen or the bathroom – flow restrictors are built into aerators.
Thus, in removing the flow restrictor from the Delta kitchen faucet, the first step usually is to disconnect the aerator.
Soon in our discussion here, you will learn how to locate and remove flow restrictors from Delta kitchen faucets yourself.
Can You Remove Flow Restrictor from Delta Kitchen Faucet?
Absolutely, yes! Flow restrictors are removable. Whether you consider it unnecessary in your faucet or you want to clean and reinstall it, you can always remove it.
The good part is you don’t have to call a plumber for this task. Removing flow restrictors from Delta kitchen faucets is one of the easiest and DIY-friendliest plumbing repairs you can do on your own.
Best of all, you don’t really need many special plumbing tools for it. If you are ready to remove the flow restrictor in your Delta kitchen faucet, roll your sleeves and follow the step-by-step guide below.
How to Remove Flow Restrictor from Delta Kitchen Faucet
Tools Required:
- A flat-head screwdriver
- Pliers or an adjustable wrench
- Towel
- Delta repairing kit
Step 1: Turn off Water Supply
First, you need to stop the water supply to your kitchen sink. Every sink has a hot and cold water valve that you can find below it.
Locate and turn them off. If this doesn’t work or you don’t know how to, turn off the main water supply to your house. After doing this, open your kitchen faucet to drain any remaining water.
Step 2: Open Your Faucet Base
The second step in removing the flow restrictor is to open the faucet base. Now, look at your faucet handle’s base. You will see a screw holding it up. Using the adjustable wrench, loosen the screw anticlockwise. However, some faucets have a safety cap covering the screw. In that case, ]you can use a flat-tip screwdriver to pry it off.
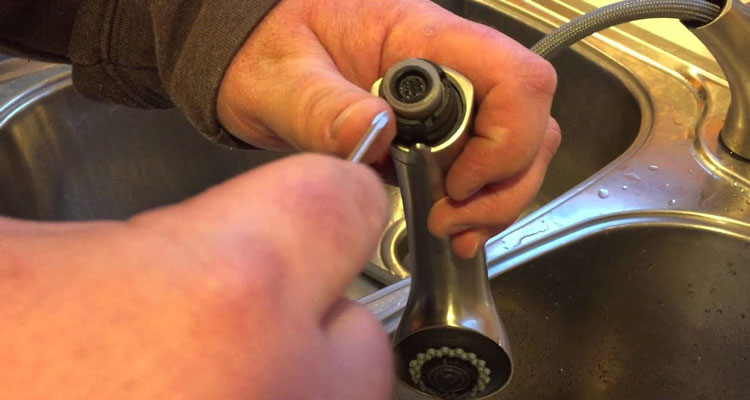
Step 3: Remove the Aerator
To remove the aerator from Delta faucet, turn it anticlockwise using your bare hands. This works most of the time, except when you can’t apply pressure or the aerator is slippery. In that case, you can use a towel to try and remove it.
If none of these work, use the pliers or adjustable wrench to remove the aerator. However, be cautious and do not apply too much pressure, as this can scratch or break your faucet.
Step 4: Take Out the Flow Restrictor
After the delta pull-down kitchen faucet aerator removal, you may see dirt particles above the screen. Remove the washer and place the aerator under running water to clean it. However, before doing this, place a towel on the sink to block the holes.
Doing this will prevent the loss of small particles like screws. Then, push gently against the center of the aerator to force the flow restrictor out. Alternatively, you can gently twist the flow restrictor with your screwdriver, loosening it from its connections. Then, use the wrench to remove it from the faucet.
Step 5: Clean Any Debris
Check the flow restrictor for debris or any residue. If it looks spotless, the water lines may be the cause of the issue. In that case, you may need to flush it.
Run the hot and cold flows for at least 15 seconds each to clear out lingering dirt particles. You may have to use a toothbrush for better cleaning. Then, turn your water flow on for at least 30 seconds until it looks clear.
Step 6: Replace the Flow Restrictor
Now that you have cleaned the aerator and flow restrictor, it’s time to place them back. Carefully attach each bit to its original placements, turning in a clockwise direction until snug.
Then, connect the aerator to the faucet and run the water again. At this point, you will notice the flow restrictor working fine and water flowing at the right pressure.
Step 7: Clean Up Any Mess
This minor plumbing process may leave your kitchen a bit dirty. So, you will have to clean up with soap and water to restore order. You can also use an enzyme cleaner to remove debris inside the hole to protect against future leaks.
All things being equal, these are all it takes to increase water pressure in the kitchen faucet.
Benefits of Having a Flow Restrictor in Delta Faucet
So far, we’ve discussed several pertinent questions about a flow restrictor, including how to remove it from the Delta kitchen faucet. Let’s wrap it up by examining some of its benefits. Trust me, there are several desirable benefits to having it in your faucet.
1. Flow Resistors Aid Water Filtration
Whether for household or industrial use, water should be clean and free of contamination. Thankfully, flow restrictors help to enhance the filtration of water that flows out of Delta faucets. Together with the aerator, a flow restrictor helps to filter out dirt from the water that is supplied through the faucet spout.
2. Prevention of Unnecessary Water Wastage
Apart from filtration, flow restrictors also help to prevent water wastage. Generally, the water flow rate through a restrictor is only about half the rate in a faucet aerator without flow restrictor.
3. Energy Saving
Because Delta kitchen faucets with flow restrictors regulate water pressure, they also help to save energy. Suppose you are thinking of a way to reduce your home’s water bill. A good way to start is by ensuring all your faucets have flow resistors.
4. Flow Resistors Help to Manage Water Pressure
This is probably the best benefit that flow restrictors have. They manage water pressures through faucets. In the long run, this helps to reduce the risk of wear in pipes.
Key Takeaway
While flow restrictors have several desirable benefits, they can also make kitchen chores unnecessarily time-consuming when they are blocked. To remedy this, you’ll require a Delta kitchen faucet pressure adjustment.
Thankfully, this is a straightforward task. Following the guide above, you can remove water restrictor from Delta faucet without the help of a plumber. But before jumping into the DIY spirit, be careful to note all the safety precautions in the guide.
When disconnecting the aerator, remember to support the neck before turning the aerator. Also, don’t go too hard when tightening the aerator back into position.