If you are experiencing problems with your frost-free sillcock outdoor faucet, it is important to replace it as soon as possible. Here’s how.
Not only can a faulty sillcock outdoor faucet lead to water spilling all over the place, but it can also damage your deck and ruin your landscaping.
By replacing your sillcock outdoor faucet as soon as possible, you can avoid any costly repairs and keep your property looking its best.
Installing a frost-free sillcock outdoor faucet is one of the easiest home improvement projects you can undertake. You just need to unscrew the old faucet, remove the old sillcock, and replace it with a new frost-free sillcock outdoor faucet.
There are a few things you will need before you start: a new sillcock, an adapter, a wrench, and a plumber’s tape. If you are replacing an existing sillcock outdoor faucet, all you need is the adapter and the wrench.
How to Replace a Frost-Free Sillcock Outdoor Faucet
Required items:
- Frost-free sillcock faucet
- Pliers
- Pipe wrench
- Adjustable wrench
- Pipe tape
- Drill
- Drill bits
- Screws
Step 1: Turn off the Water Valve
Your first task is to find the water valve. Shut off the valve supplying water to the faucet. If you cannot locate the valve of your faucet, consider shutting off the building’s main water supply.
Furthermore, you will find the main water valve in the basement or at the front of the house. After shutting off the water supply, it’s time to drain the pipes. Cut the cold water pipe with a pipe cutter and drain the system.
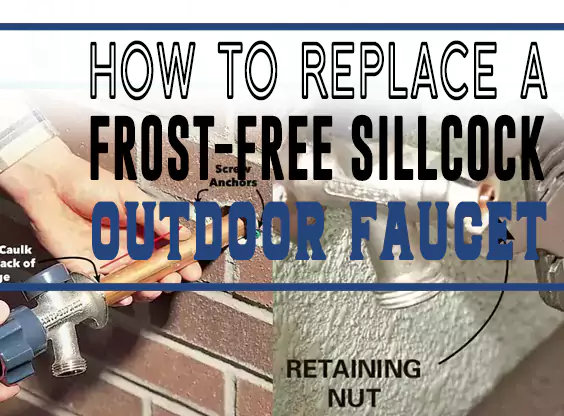
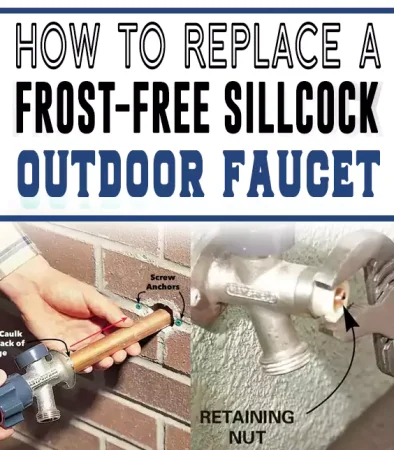
Step 2: Remove the Old Outdoor Faucet
Fix the wrench on your existing faucet’s neck close to the wall. Turn the wrench anti-clockwise while holding it firmly and unscrew the nuts. After taking out the screws, slide the faucet out of the hole.
Step 3: Install a New Outdoor Spigot
Create holes for attaching the new outdoor sillcock faucet to the foundation. Mark the screw holes while holding the faucet in place and drill with a masonry bit.
After drilling the holes, apply caulk and insert the stem into the hole. Now place the faucet mounting plate on the caulk and seal any available gap. It’s time to connect the foundation and the faucet with concrete screws. Screw it through the mounting plate holes.
Step 4: Connect the Spigot to the Existing Water Line
After installing the new frost-free sillcock outdoor faucet, you can connect it to your waterline. Use a plier to hold the faucet’s end and connect it to your water pipe.
Furthermore, turn on the water valve to check for leaks. If there are any leaks, consider checking the water pipes. Use the tape to measure a new pipe for the water connection if there are leaks.
Frost Free Faucet Leaking from Top – Reasons and Solutions
The vacuum breaker is the reason your faucet leaks from the top. It has a valve that can break under pressure. Furthermore, this vacuum breaker contains a watertight section and a diaphragm.
If you turn on the water switch, the pressure can affect the diaphragm and unlock the valve. When the valve is open, it ensures a flow of water. But when you turn off the water, the pressure will change its direction towards the water inlet with a seal.
You never have to worry about water flowing backward with the seal. If you install a frost-free faucet with a worn-out seal, leaks can occur.
When the seal is weak or broken, there will be water leaks from your faucet top. If you want to replace it, consider visiting the store with your existing part. It will help you select the exact fit to avoid issues while fixing the outdoor sillcock.
Use a screwdriver to unscrew the cap on your faucet’s top. Furthermore, you can remove the breaker by unscrewing the nuts. Now that you know why your faucet leaks from the top, it’s time for solutions.
How Much Does It Cost to Replace a Sillcock
Replacing a sillcock can be a costly proposition, depending on the make and model of your home. However, there are a few factors that you can take into account to determine an approximate cost for this repair.
First, find out how many sillcock bolts are needed for replacement.
Second, find out the dimensions of the sillcock in question, as this will help you to determine the size and type of sillcock bolt needed.
Third, consult a home improvement or repair specialist to get an estimate for the entire job.
Fourth, factor in any applicable taxes and labor costs, and fifth, add up the total cost of the repairs to get an accurate estimate for the cost of replacing a sillcock.
Conclusion
Replacing your frost-free sillcock outdoor faucet is a must-do if you want to enjoy a hassle-free water supply for your garden.
Not only will you be getting clean and contamination-free water, but you’ll also be saving yourself from the hassle of frozen pipes.
If you want to replace a frost-free faucet without issues, consider the discussed steps. You must follow the methods to avoid unexpected water damage that attracts cost.
No matter your level of experience, replacing faucets requires focus. If you have a worn-out or broken vacuum breaker seal, you can replace it with the illustrated methods.
