Knowing how to remove faucet handle cap on your taps is crucial if you need to make a repair in your bathroom or kitchen. Here’s how you can do it.
Removing a faucet handle cap is a common task when you need to repair or replace a faucet. Some have no screws while others have a visible screw that needs unscrewing.
Whichever design you have on your faucet, it is possible to remove the handle cap and make the repairs needed to get it back to perfect working order.
What Is A Faucet Handle Cap?
A faucet handle cap is a small cover or decorative piece that conceals the screw holding the faucet handle in place.
These caps are typically found on the top or side of the faucet handle and serve both aesthetic and functional purposes.
Faucet handle caps are a small but important component of faucet design, blending functionality and aesthetics. They ensure easy access to the faucet’s internal mechanisms while maintaining the faucet’s overall appearance.
The primary function of a handle cap is to conceal the screw that attaches the handle to the faucet’s stem. This gives the faucet a cleaner, more streamlined look.
They often have a decorative design, which might include the brand logo or a simple, smooth finish. Their design complements the overall look of the faucet.
Handle caps can be made of various materials, including plastic, metal, or ceramic, depending on the faucet’s design and quality.
They come in a range of colors and finishes to match the faucet, such as chrome, brushed nickel, bronze, or colored finishes.
By covering the screw, the cap also protects it from water, soap, and other elements that could cause corrosion or buildup, which might make it harder to remove the screw in the future.
They are usually easy to remove. Depending on the design, you can pry them off gently with a flathead screwdriver or by hand if they are designed with a notch for finger grip.
Removing The Handle Cap on Your Faucet
Tools Needed To Remove Faucet Handle Cap
- Flathead screwdriver
- Allen wrench
Step-by-Step Guide To Remove The Faucet Handle Cap
1. Gather Tools: Before you start, ensure you have the right tools. You’ll likely need a flathead screwdriver or an Allen wrench, depending on the type of faucet handle you have.
2. Turn Off Water Supply: Safety first! Make sure to turn off the water supply to the faucet. This is usually done by turning the valves under the sink clockwise.
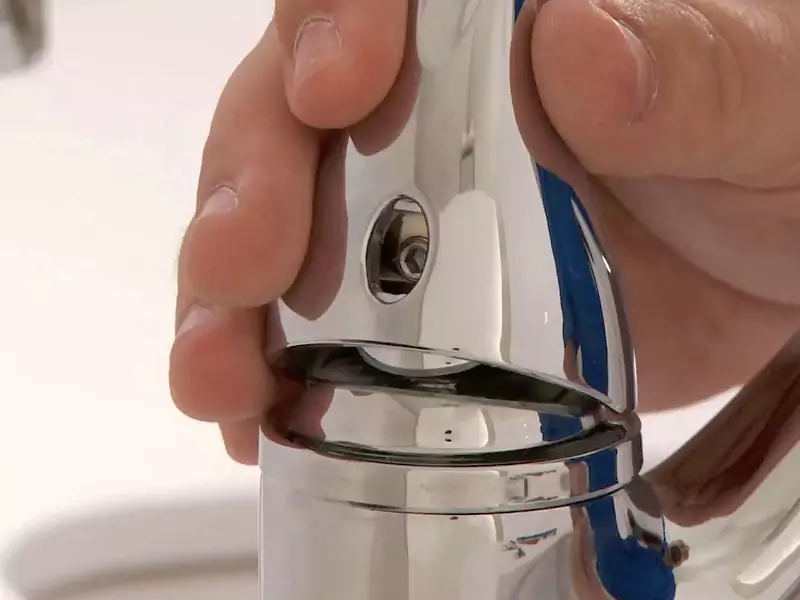
3. Identify the Type of Cap: Faucet handle caps can be different. Some are screw-on caps, while others are snap-on. Look closely to determine the type of cap you have.
4. Remove the Cap:
For Screw-On Caps – Use a flathead screwdriver to gently unscrew the cap. Be careful not to apply too much force to avoid damaging the cap.
For Snap-On Caps – These caps are usually held in place by a small notch or clip. Use the flat edge of a screwdriver to gently pry the cap off. Insert the screwdriver at the edge of the cap and apply gentle pressure to pop it off.
5. Access the Screw Underneath the Cap: Once the cap is off, you’ll see a screw that holds the faucet handle in place. Use a screwdriver or an Allen wrench to remove this screw.
6. Remove the Handle: After removing the screw, you should be able to lift the handle off. If it’s stuck, wiggle it gently to loosen it.
7. Proceed with Your Repair or Replacement: With the handle removed, you can now proceed with whatever repair or replacement work you need to do.
If you’re not confident in doing this yourself or if you encounter any complications, it’s always best to consult a professional plumber.
How To Remove Faucet Handle Without Screws
Removing a faucet handle that doesn’t have visible screws involves a slightly different process. These types of handles are usually secured by a hidden mechanism.
Always remember to turn off the water supply before attempting any repair work on a faucet to prevent water damage or accidents.
Here’s how to remove them:
1. Locate the Hidden Fastening Mechanism
Many faucet handles without visible screws have a cap covering the screw. This cap is often located on the top of the handle and may have a decorative design or logo.
In some cases, especially in lever-style handles, the set screw (often an Allen screw) might be hidden under a small cover at the base of the handle.
2. Remove the Cap
If there’s a cap on the top of the handle, carefully pry it off using a flathead screwdriver or a similar tool. Insert the tool under the edge of the cap and gently lift it off.
For handles with a set screw at the base, look for a small recessed area that might have a cover. Gently pry off this cover to expose the set screw.
3. Loosen the Set Screw
Once the set screw is exposed, use an Allen wrench or a similar tool to loosen it. You don’t always need to completely remove the screw; just loosen it enough to release the handle.
Turn the wrench counterclockwise to loosen the screw.
4. Remove the Handle
After the set screw is loosened, you should be able to pull the handle off. If it doesn’t come off easily, gently wiggle it back and forth while pulling it away from the faucet stem.
5. Proceed with your repair
With the handle removed, you can now access the internal parts of the faucet for repair or replacement.
6. Be Gentle
It’s important to be gentle during this process to avoid damaging the finish of the faucet or the handle itself. Some faucets might have unique mechanisms, and forcing them could cause damage.
What Happens When You Have A Stuck Faucet Handle
A stuck faucet handle can be a frustrating issue to deal with, and it happens for a few common reasons.
Understanding why a faucet handle might get stuck can help you determine the best approach to fix it.
Causes of a Stuck Faucet Handle
Mineral Deposits: Over time, water can leave behind mineral deposits, especially in areas with hard water. These deposits can build up around the faucet handle, making it difficult to move.
Corrosion: Metal components within the faucet can corrode, causing the handle to stick. Corrosion is more common in older faucets or in areas with high humidity.
Worn Out Components: Gaskets, O-rings, or other internal components can wear out or become damaged, leading to a handle that is hard to move.
Dried Lubricant: Sometimes, the lubricant that helps the handle move smoothly can dry out or collect debris, causing the handle to stick.
Over-tightened Screw: If the screw that holds the handle in place is over-tightened, it can make the handle difficult to move.
How To Fix A Stuck Faucet Handle
Apply a penetrating oil like WD-40 to the base of the handle. Let it sit for a few minutes to break down mineral deposits or corrosion.
After applying the penetrating oil, gently wiggle the handle back and forth to loosen it. Be careful not to use too much force, as this can break the handle.
Use a solution of white vinegar and water to clean around the handle. This can help dissolve mineral deposits.
Inspect for Visible Damage! If you can remove the handle, inspect it and the stem for visible signs of wear or damage.
If you find any worn or damaged parts, such as gaskets or O-rings, replace them.
Apply a suitable lubricant to the moving parts once you’ve cleaned and inspected them.
When reassembling, ensure the screw is tight enough to hold the handle in place but not so tight that it causes sticking.
How To Loosen A Faucet Handle
Loosening a tight or stuck faucet handle involves a few steps. It’s a relatively simple process, but it requires care to avoid damaging the faucet.
1. Turn Off the Water Supply: Before you start, make sure to turn off the water supply to the faucet to prevent any accidental water spillage. This is usually done by turning the valves under the sink clockwise.
2. Identify the Type of Faucet Handle: Determine whether your faucet handle has a visible screw or if it is hidden under a cap. The approach will slightly differ based on this.
3. Remove the Cap (if applicable): If there’s a decorative cap on the faucet handle, gently pry it off using a flathead screwdriver. Be careful not to scratch the finish.
4. Loosen the Set Screw: Use an appropriate screwdriver or an Allen wrench to loosen the screw securing the handle.
For a handle with a top-mounted screw, this will be straightforward. If the screw is located under the handle (often in lever-type handles), you may need to look for a small set screw at the base or side of the handle.
Turn the screw counterclockwise to loosen it. You don’t need to remove the screw completely; just loosen it enough to free the handle.
5. Gently Wiggle the Handle: After loosening the screw, gently wiggle the handle back and forth. This should help free it if it’s stuck due to mineral deposits or corrosion.
6. Apply Penetrating Oil (if necessary): If the handle is still stuck, apply a penetrating oil like WD-40 around the base of the handle. Let it sit for a few minutes to loosen any mineral buildup or corrosion.
7. Check for Mineral Deposits: Once the handle is off, inspect for mineral deposits or corrosion. Clean any deposits with a solution of vinegar and water, and scrub gently with a soft brush.
8. Reassemble the Handle: After cleaning and inspection, reassemble the handle. Make sure the screw is tight enough to keep the handle in place but not so tight that it causes the handle to stick.
9. Test the Handle: Turn the water supply back on and test the handle to ensure it moves freely and doesn’t leak.