You can find a mounting nut beneath the kitchen sink for tightening a kitchen faucet. Here’s how to tighten a kitchen faucet nut.
The frequent use of the faucet could cause its nut to loosen. To keep the kitchen faucet from getting loose, you need to tighten the nut.
But some faucets don’t come with instructions on how to tighten their nuts. As a result, you could get stuck on where to begin. Luckily, this guide will show you how to tighten a kitchen faucet nut under a sink in a detailed step-by-step procedure.
Loose faucets cause water wastage, inflating your water bill. You also have to deal with the mess from the spilled water. That’s why it’s essential to inspect the faucets installed in your kitchen constantly. If loose, use the following process to tighten the nut.
How to Tighten A Kitchen Faucet Nut Under the Sink
Step 1: Gather the Required Tools
The process will not be successful without the right tools. You, therefore, need to look for essential tools before you begin. Ensure you have;
- Adjustable pliers
- Basin wrench
- Flashlight or headlamp
- Plastic gloves
- Googles
- Screwdriver
- Duct tape
If you don’t have them, you can easily access them in the hardware shop next door. More so, they are affordable.
Step 2: Prepare Working Space
After assembling all the necessary tools for the job, you need to prepare your workspace. You should ensure the area is empty since you want to tighten a lock nut underneath your kitchen sink.
Most people use the space under their kitchen sinks as a storage area. If that’s true in your case, de-clutter the place. Farmhouse sinks have cabinets beneath them. Please take out the removable drawers and everything in them and keep them safe.
Also, keep them in a way that will enable you to return them as they were before. Ensure nothing is left to obstruct you from carrying out the procedure smoothly.
Step 3: Putting on Safety Gear
When everything is clear below the sink, protect yourself from unexpected harm. The faucet’s nut may be in a location you need to look up while tightening it.
Dust and other particles could have accumulated below the sink and may enter your eyes. It will help if you put on goggles to protect the eyes.
Also, you may need to try to attempt to turn the turn using your hands. In the process, you could irritate your fingers or skin. Wearing plastic gloves will help.
Step 4: Positioning the Faucet to Sit Correctly
After putting on your protective gear, you need to access the faucet and adjust it. When a nut loosens, the fixture also becomes loose. In return, leaking occurs.
The first thing to do before tightening the lock nut under the sink is to put the faucet back in position. But because most spaces beneath the kitchen sink are usually dark, you need some lighting.
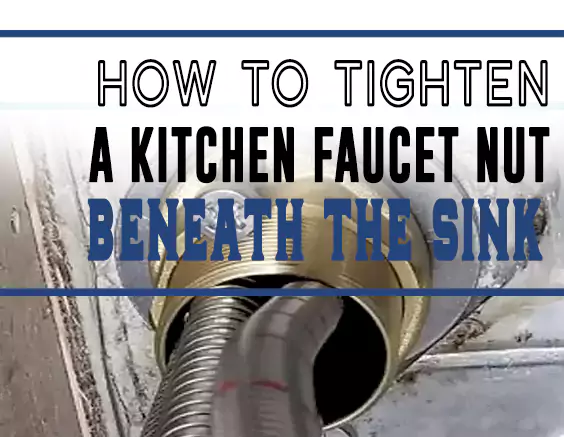
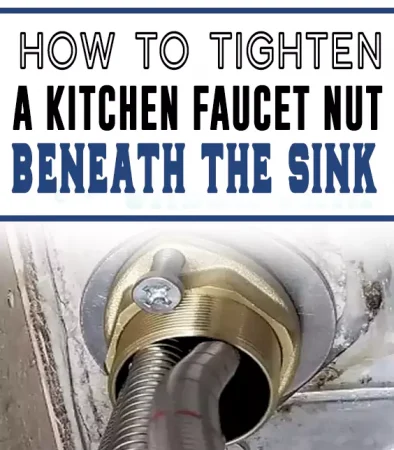
Switch on your headlamp and switch it on. If you don’t have one, a flashlight will work out fine. Then locate the faucet. If there’s an obstacle like a p-trap, take it out. Use an adjustable plier to unscrew the p-trap’s nuts.
After removing any obstructing parts, adjust the faucet to sit correctly and hold it in position, ready for tightening the nut.
Step 4: Tightening the Nut
After setting the faucet to place, it’s time to tighten the fixation nut on the faucet. It could be easier if someone helped you hold the fixture in position while securing the nut.
You can tighten a loose kitchen faucet nut using your hands if it’s easy to rotate and access with hands. But you may find some faucet nuts are stuck. That’s why it’s essential to have the proper nut-tightening tools.
A basin wrench will work out excellently. You only need to clamp it on the nut’s jaws. After securing a firm grip, tighten the nut by rotating it clockwise. Keep turning it until it can’t move anymore.
But take precautions, not to over tighten. Some nuts get made with plastic. When over secured the plastic nut, can crack. It would help if you got plastic nuts off the faucet. Replace them with sturdy ones like those made with metal.
But it doesn’t mean that you can over-tighten the metal nuts. If you do, the nuts can be stuck. Removing stuck faucet nuts is another plumbing task.
Step 5: Test the Faucet
After tightening the faucet’s lock nut, test to check if the fixture is well secured. You will need to hold it to affirm its steadiness. Also, check whether it’s leaking. If everything is okay, you will have successfully tightened a loose faucet nut underneath your kitchen sink.
The above procedure is not only for tightening the loose faucet nuts, You can also use it to tighten a nut under a new sink fixture. Sometimes your kitchen faucet may leak, and you wonder why. The following are reasons why they could leak. We’ll also discuss possible solutions.
Alternatives to a Basin Wrench
Duct Tape
An excellent example is duct tape. You only need to cut the tape into strips of 1 – foot length. Then cut the strips lengthwise at the center to get two thin strips. Next, place one narrow strip on the other, sticking it to fit to create one robust piece.
Then wrap this sturdy strip around the loose nut, leaving a tail end long enough to grasp comfortably. Then pull the tail to secure the nut. Continue pulling until the nut can move no further.
Remember to be keen not to over-tighten the nut. Remove the duct tape when you finish securing the nut.
Zip-tie
If you don’t have duct tape, you can use two coins or a zip-tie. Like the duct tape, tie the zip-tie tightly around the nut and pull it until secure.
If you opt to use the coins, the quarter-sized ones will work out great. Position the two coins on the nut’s side. Then hold them firmly using your knuckles and turn them clockwise. Stop when you can’t turn the nut anymore.
What’s impressive about using the above tightening tools is that it doesn’t matter the size of the nut. You can use them to tighten a large nut under the sink effectively.
You will need the same tools to loosen kitchen faucet nuts. What will change is the rotation direction. You will need to turn the nuts anti-clockwise.
5 Common Reasons for a Leaking Kitchen Faucet
A leaking faucet wastes water and hikes your water bill. It’s therefore essential you fix it immediately after you discover the leakage.
Broken Washer
You will find a washer resting on a valve seat. It wears out with time due to friction. As a result, the faucet starts leaking. A washer can also cause leakage when it’s of the wrong size or has gotten installed wrongly.
The solution to this is to replace a new washer. Also, check whether it’s properly fixed and of the correct size. If not, install a washer of the right size properly.
Damaged Cartridge
Faucets with cold and hot water handles have cartridges. A cartridge controls the faucet’s water flow. It’s a valve located on every handle. When you see your faucet dripping, it’s a sign that the cartridge could be broken. The remedy to this is to fix a new cartridge.
Loose or Worn Out O-Ring
An O-ring is a small disc located inside the faucet. It holds the faucet’s handle in place by connecting it to the stem screw. When used for a long time, it can wear out or loosen. As a result, the faucet’s handle may start leaking.
Rectify this situation by tightening or installing a new O-ring.
Water Pressure
Sometimes water pressure can cause leakage. You can have a clue there’s an issue with your house’s water pressure if the faucet leaks when you operate a particular handle or at specific times. If the cause is the water pressure, solve the problem by regulating it to the correct pressure.
Malfunctioning Valve Seat
The faucet can leak from the spout. The cause could be a malfunctioning valve seat. It can cause a leak when corrosion occurs or sentiments buildup.
The best solution to this problem is to replace the valve seat. With the above information, you can now tighten a loose faucet nut without employing the services of an expert.
Stabilize a Kitchen Faucet
A kitchen faucet’s handle and base might become loose over time. This may cause the faucet to drip since the water pipes that feed it might be damaged by a loose foundation.
One of the most common causes of kitchen faucets coming loose is a nut that keeps the base and head of the faucet together tightly.
The threads of this nut, which are placed on the bottom of the mount, might get worn over time and come free.
A loose kitchen faucet is a problem that practically everyone encounters at some time. This may be a nuisance at first, but if it grows worse, it might cause serious damage to the pipes.
7 Steps to Stabilize Kitchen Faucet to Base
You will require the following tools to stabilize a kitchen faucet. These tools are very necessary for kitchen faucet stabilization.
- Set of hex wrenches
- Masking tape
- Flathead screwdriver
- Flashlight
- Adjustable wrench
- Basin wrench
It’s not necessary to hire a plumber to fix a loose kitchen faucet. Just tighten the bolt that holds the faucet base and head together, and you’re done.
Locating the nut is the only challenge. Rotating it till it’s snug enough is all you need to do after finding it. This shouldn’t take more than 30 minutes if you have the correct equipment. Let’s get this party started!
Step 1: Count the Number of Holes in your Present Sink
Take a peek inside the kitchen cupboards behind your sink by opening them up. You should be able to see anywhere from a single hole to four or more.
When shopping for a new double-handle kitchen faucet, keep this in mind. It is possible to disguise the fewer holes in the new faucet by installing an additional kitchen sink accessory such as a soap dispenser or garbage disposal.
Step 2: Clear Everything under the Sink
For most individuals, the cupboard beneath their sink is used as a place to keep cleaning supplies and other supplies. Make sure you don’t get yourself covered in dust by removing all the stuff from the cabinet and cleaning it up a little.
Don’t get dirt on your face (or eyes, in the worst scenario) while searching for the bolt by cleaning the top surface.
This additional preventative action isn’t mandatory, but it’s always a good idea to be safe rather than sorry.
Step 3: Get-rid of your Old Faucet
Turn off the hot and cold water supply valves first. Then turn on the faucet to dissipate the water’s accumulated heat. Adjustable wrenches may be used to disconnect the water supply line.
Your old faucet’s supply lines may be salvageable; but, if they aren’t, you’ll need to buy a new set to match your new faucet. Remove the old faucet by unscrewing the bolts with your basin wrench and then lifting it out of the sink.
In order to reattach the kitchen faucet, you must get rid of your old one.
Step 4: Turn off Water Valves
First, locate and turn off any water valves beneath the sink before you begin your search for the bolt. This is another safeguard that must be taken for safety’s sake. Two valves would be found beneath the sink.
In the event of a pipe rupture or whatever else, turn them off so that you don’t get drenched from head to toe.
Step 5: Get yourself Under the Sink
Finally, place the flashlight inside the cabinet beneath your sink and face it upwards. In order to clean the bottom of your sink, make sure you are positioned such that you are facing it straight.
You’ll need to shine a spotlight on the cabinet’s ceiling to find a bolt. Your kitchen faucet’s placement should be where this bolt is located.
Step 6: Get the Wrench of Perfect Size
Once that’s done, measure the nut on the faucet bolt to determine the proper size of your wrench. This is the nut you’ll be squeezing shut. The nut that keeps the faucet in place may be held in place using an adjustable wrench of a suitable size.
Step 7: Revolve the Nut
Once you’ve got a good hold on the nut, spin it clockwise with your wrench. Because of this nut’s placement and the size of your cabinet, you may have to get into an uncomfortable posture to complete the work.
Overtightening the nut might be dangerous. In order to keep your faucet from leaking, you should not overtighten it, but it doesn’t imply that you can. Keep on for a while then come to a halt. If you attempt to overtighten it, it may slide off the bolt.
Finally, you’ve completed your task! Go outside and switch on your water supply again. The faucet should be tested before you put your things back in the cabinet to be sure it’s working properly.
That means you’ve succeeded if the screw is no longer loose. Put everything back where it belongs.
Turn the nut clockwise with your wrench to tighten it. In order to reach your sink, you may have to twist your body in an uncomfortable way, but this shouldn’t be an issue for you.
Key Takeaway
The water supply pipes of a kitchen faucet might burst if the base is unsecured. As a consequence, there is a bothersome leak. Re-tighten the bolt that holds the faucet’s base and head together to cure this problem.
It’s inconvenient to have a leaky kitchen faucet, but it happens more often than you think. Fortunately, most of these problems may be remedied at home.
Because of their constant use, the nuts securing faucets installed beneath the sink may loosen. As explained above, the fixture may start leaking.
You need to tighten the faucet nut under the sink as soon as you discover it’s loose. Also, a flexible fixture or leakage could give you a sign of a loose nut.
To avoid the inconveniences caused by a loose nut, you should frequently investigate the faucet’s nut underneath your sink.