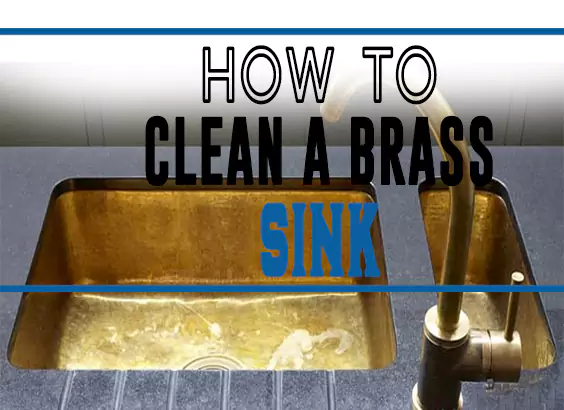
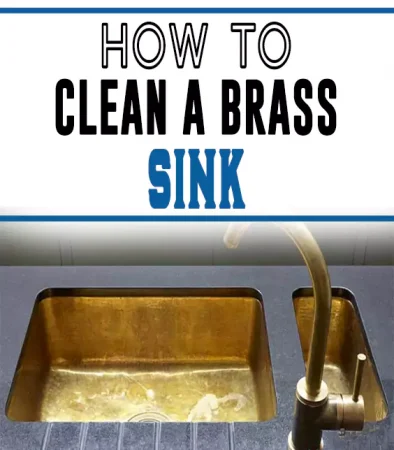
If you need to clean a brass sink and don’t know the best way, we’ve got your back. Here’s how to clean a brass sink using natural methods.
Brass is a sturdy metal made using copper and zinc. It does not rust and contains a beautiful, bright, golden color. That’s why most artisans use the material to make kitchen sinks.
Moreover, brass sinks offer services for a long time. It’s also affordable and easy to clean.
With time, oxygen, water, and chemicals usually make a brass sink tarnish. So how do you clean a tarnished brass sink? You can clean any tarnished brass sink using this guide. After cleaning, you have to maintain the sink regularly to retain its gorgeous gold color and shine.
If your brass sink has patina and you love the look, you may decide to maintain it as the patina is not harmful. Alternatively, you may clean the sink to its original look. The following step-by-step guide will show you how to clean both the kitchen and bathroom brass sink.
How to Clean a Brass Sink Naturally
Most of the ideal cleaning agents can get found in your kitchen’s cupboard.
Using Vinegar and Salt
Put half a cup of vinegar in a small bowl. Then add a teaspoon of salt and mix well until all the salt dissolves.
In case the mixture is too light to use, add some all-purpose flour to make a paste.
Then apply the mixture to the entire sink using a soft, clean cloth or rag. Alternatively, you can use an old toothbrush.
Then allow it to sit for approximately 10 to 15 minutes.
Using Lemon Juice and Baking soda
The combination produces a sparkling clean brass finish. It is excellent to use if you want to clean heavily corroded brass.
You can use a ready-made lemon juice or make one from the available lemons in your fruit basket.
Take a medium-sized bowl and squeeze up to a half cup of lemon juice. Then scoop some baking powder and add to the lemon juice. The quantity should be a teaspoon.
Then mix the mixture well until a paste of the proper consistency forms.
Then use a soft cloth or brush and apply the mixture to the whole brass sink. Leave it until it dries.
Using Toothpaste
If you have neither baking soda, lemon juice, salt, and vinegar, use white toothpaste. Its cleaning power leaves a brass sink clean and well-polished.
Don’t use gel toothpaste. Also, avoid kinds of toothpaste with artificial flavors. They can react with the brass, causing severe damage.
Use an old, clean toothbrush, cloth, sponge, or your hands to apply the toothpaste to every corner of the sink. Then allow it to sit for a few minutes.
Using Ketchup
The fasted way to clean brass is by using ketchup or tomato juice, or sauce. Therefore, if you don’t have any of the above cleaning ingredients, you can also use these tomato-based products.
Use a clean, soft brush or cloth to apply the tomato juice, sauce, or ketchup around the entire brass sink. Tomatoes contain a mild acid that acts slowly but surely.
If your sink is not that dirty, you can leave the tomato sauce or juice on the brass sink for approximately 5 – minutes. If soiled heavily, you need to be patient. Allow the tomato product to sit for at least 30 minutes.
In case your sink has patina, and you love the look, don’t wash it away. Apply a mixture of soap and water to the sin and leave to settle for a short time.
How to Clean a Brass Sink With Cleaner
Step 1: Determine the Brass Sink
Before starting the cleaning process, determine if your sink got made with solid brass or brass-plated. Today, the market floods with countless imitations of brass sinks. It would be best if you were sure your brass sink is authentic.
You, therefore, need to take a magnet and place it on your brass sink. If it sticks, then your sink is only brass coated. But if the magnet doesn’t stick, you are dealing with an actual brass sink.
Also, investigate whether your brass sink is lacquered or unlacquered. It will help you choose suitable cleaning materials and procedures.
When a brass sink has gotten lacquered, it has a thin coating to prevent it from tarnishing. It makes the brass sink appear shiny. If your sink has patches of shiny areas, it is lacquered. Otherwise, the sink is unlacquered.
Step 2: Prepare the Sink
When you have accumulated all the cleaning items, you need to prepare for cleaning. It’s essential to keep safe while dealing with some things and chemicals. First, put on an apron to prevent soiling your clothes while cleaning the sink.
You can use either a commercial or natural cleaning agent on your sink. Some of these agents may affect your skin, such as making it dry.
Start by removing anything like utensils or mouth care items placed in and around the sink. Then remove any large particles like foodstuff or rolls of hair. You can use your hands or a soft cloth.
Step 3: Apply Suitable Brass Cleaner
If you have the budget or prefer a commercial brass sink cleaner, it’s worth using it. The cleaner works very quickly and excellently, making it the fasted way to clean brass.
The best brass cleaners are those made with plant ingredients. They don’t corrode a brass sink. Apply the brass commercial brass cleaner to the whole sink and allow it to sit for several minutes.
Step 4: Scrub the Sink
After the cleaning agent has settled for the required time, start rubbing the brass sink’s surface. Concentrate on the areas with much dirt or stubborn stains. Use a soft-bristled toothbrush or a clean, soft cloth to scrub the entire sink.
Rub the sink until all dirt, grime, corrosions, stains, and other impurities are entirely gone. Repeat the procedure if your sink is cracked, scratched, or has stubborn stains.
If the stains are persistent, add some elbow grease. It will also help lift the grime.
Step 5: Rinse or Wipe the Sink
Use warm, clean water to rinse the sink when all stains, corrosion, and other dirt are gone. Rinse until sparkling clean.
Alternatively, you can wipe the sink clean after scrubbing it. You only need to use a clean, wet, soft cloth. Wipe all grime and dirt away until the surface becomes spotless.
After rinsing or wiping the sink clean, use a dry, clean piece of soft cloth to dry it.
Step 6: Do the Polishing
You will need your brass sink to shine after cleaning it. That’s why it’s essential to apply some brass polish after drying it. Use reliable brass polish or recommended oils like linseed oil. Apply to your sink’s entire surface.
After polishing until you can see its brilliant gold color, you will have cleaned your brass sink successfully.
How to Clean A Tarnished Brass Sink
Brass sinks usually get tarnished after some time. If you are wondering how to get rid of tarnish in your brass sink, follow the following guide;
Step 1: Collect the Necessary Materials
Like other cleaning procedures, the first step is to accumulate everything required for the process. You will require;
- Vinegar
- Salt
- Flour
- Two pieces of clean, soft clothes
Step 2: Mix Salt, Flour, and Vinegar
- Make a mixture using salt, vinegar, and flour.
- Put some vinegar in a cup up to halfway.
- Add a teaspoon of salt and mix until all the salt dissolves.
Next, add some flour to make some paste. Ensure the paste is neither too thin nor thick.
Step 3: Rub the Mixture into the Tarnished Sink
Scoop some mixture with a clean piece of soft cloth and rub it onto the sink’s surface. Put more effort into the tarnished area.
Step 4: Wipe the Sink Clean
After rubbing, take another clean, soft cloth and wipe out the mixture until the sink looks sparkling clean.
Apart from getting tarnished, a brass sink can oxidize with time and form a green coloration called patina. If you like your brass sink to appear as good as new, you need to remove the green oxidation.
How to Keep a Brass Sink Shiny
Your brass sink will appear shiny after cleaning. Unfortunately, the glossy appearance disappears within a few days. The only solution is to maintain your brass sink’s shininess regularly.
Step1: Collect the Necessary Materials
You will require some items for your brass sink to become and remain shiny. The first thing is to collect them. They include the following;
- A reliable brass polish
- Two pieces of clean, soft, dry clothes
- Sprayer, cotton pad, or brush
Step 2: Apply and Rub Polish on the Brass Sink
Your brass sink may be shiny after cleaning and polishing it. But for it to shine more, you need to polish it again.
Start by putting polish on a clean, soft cloth. Then rub every part of the brass sink for some time. If your sink has scratches, use a brass cleaner that will even or smoothen the area.
Afterward, take another piece of soft, dry cloth and buff the polish area.
Step 3: Rinse the Brass Sink
Though not all brass polishes are acidic, it’s essential to neutralize them after using them on a brass sink. After buffing the sink, rinse it using clean water.
Step 4: Clean Any Residue
It’s not a surprise to find some residue after neutralizing a brass polish. Please remove all of them until the sink is completely clear.
Step 5: Coat the Sink
After removing all the residues:
- Coat your brass sink using a reliable brass coat like Everbite.
- Start by dipping a piece of dry, soft cloth, sponge, brush, sprayer, or cotton pad in the coating.
- Then apply to the entire surface of your brass sink.
For optimal results, apply the coating twice. The second coating should be applied approximately after an hour to stick appropriately. When through, you have succeeded in maintaining your sink shiny.
How to Remove Green Oxidation from Brass
Step 1: Get All the Materials Needed
The first step is to collect every item required for the procedure. Otherwise, it will flop! Ensure you have the following;
- Baking soda
- White vinegar
- A clean, soft cloth
- An old soft-bristled toothbrush
Step 2: Mix White Vinegar with the Baking Soda
When you get everything you require for the procedure, mix the cleaning ingredients. Put a teaspoon of baking soda in a half-full cup of vinegar. Mix the two until smooth paste forms.
Step 3: Apply and Rub the Mixture On the Brass
Put some mixture on a clean cloth and apply it to the brass. Ensure all the areas with the green oxidation have gotten the mixture. Next, allow the mixture to settle for at least 30 minutes.
Then, use a toothbrush or a soft brush to scrub the entire oxidized area.
Step 4: Rinse the Brass
After rubbing the green tarnished area until it’s off, use clean water to rinse the area. Ensure all the mixture and grime are gone until the area is spotlessly clean.
Step 5: Puff the Cleaned Area
When you finish rinsing, take a clean, soft piece of cloth and puff dry the area.
Key Takeaway
As illustrated above, brass is an ideal material for making farmhouse kitchen sinks. That’s why brass sinks are a favorite of many homeowners today.
The oxidation feature of brass sinks also makes them famous with most people who love the look of patina on brass. Those who don’t like the green tarnish can clean it off as described above.
Fortunately, there are numerous ways of cleaning a brass sink. The cleaning agents are also endless. I hope, your brass sinks will be clean in a few minutes.