Learn how to measure an undermount bathroom sink size with with handy, easy-to-follow step-by-step guide.
An undermount bathroom sink is an essential part of your bathroom. When replacing the existing sink, it’s essential to measure the sink size properly.
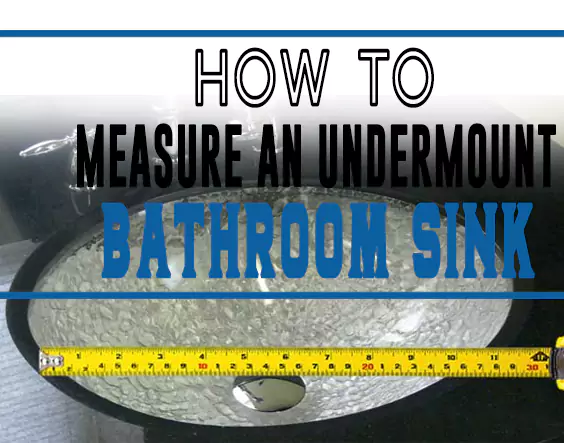
You may wonder how to measure an undermount bathroom sink. The procedure involves simple steps to follow. To get the right sink size, the places to measure are the height, width, and depth.
When you perform the process correctly, you will acquire the proper measurement with the first attempt.

How to Measure an Undermount Bathroom Sink
Step 1: Collect the Required Items
You need some items to help you with the process. Otherwise, you will not get the correct size for your undermount sink. They include the following;
- Pencil
- Paper
- Tape measure
- Clean rag
Step 2: Clear and Clean the Sink
Since the sink has been in use, it could be dirty and wet. You will have to remove any stuff on its surface and clean it. Then dry it using a clean rag. Otherwise, the mess can affect the measurements.
Step 3: Measure the Sink Width
When the sink is ready for measuring, start with the width. The sink’s width entails its wideness. You will measure how wide the sink is from one end, all the way to the other.
Use a tape measure and record your findings on paper.
Note: Most undermount bathroom sinks come with a standard width of 22 – inches.
Step 4: Measure the Sink Depth
After recording the measurements of the width, proceed to measure the depth. An undermount bathroom sink’s depth is the distance from its front to the back.
Place your tape measure on the sink’s end, near the faucet, and the other end, which’s near you. Then read the measurements and record them.
Step 5: Measure the Sink Height
With the width and depth measurements, you only need the height size to know the sink size to replace. The height entails your sink’s deepness.
Start measuring using a tape measure from the place the sink meets the countertop to its deepest part.
Record what you find on a piece of paper.
You should be careful while taking the height measurements as the sink may not fit if you pick a shorter or taller sink than the previous one.
After getting the sink’s height measurement, you will have successfully measured your undermount bathroom sink.
Undermount Bathroom Sink Sizes
Undermount bathroom sinks are of different shapes. If round or vessel, the sink’s diameter should be between 16-20 inches. The average water depth should be approximately 5 to 8 inches.
As for the standard-sized rectangular undermount bathroom sinks, the side-to-side sizes should lie between 19 to 24 inches. Their front-to-back distance should be approximately 16 to 23 inches. Their water depth should be around 5 to 8 inches.
If your bathroom is ADA compliant, the typical undermount bathroom sink should have a width of 30 inches and be approximately 11 to 25 inches deep.
A standard rectangular undermount bathroom sink should contain bowl dimensions ranging from 1 ½ to 2 ½ inches.
These measurements aren’t limited to the numbers given. They offer you direction when choosing a standard undermount sink for your bathroom.
The only essential thing to consider about the size of a typical undermount sink is its width and depth. The two should not exceed 30 inches and 22 – inches, respectively.
Knowing an undermount bathroom sink size before installing (how to fit undermount sink to quartz) is essential. It will save you from various inconveniences like reordering a new sink.
The best solution is to measure the size of the undermount bathroom sink you want to install. When you do it correctly, you will get the exact sink size you require.