
Most DIYers often overlook the importance of sealing a kitchen sink to the granite countertop. If that’s you, here’s how to seal a kitchen sink to granite.
This may not have immediate effects, but over time, you’ll notice the leaks and the stain they leave behind. That’s why you mustn’t overlook this process for undermount kitchen sink.
Like every DIY skill, sealing a kitchen sink yourself will benefit you in several ways. With the guide below, you can save the cost of paying for professional services.
How to Seal Undermount Kitchen Sink to Granite
Step 1: Do away with the old sealant
Caulking undermount kitchen sink requires removing the old sealant attached to your sink. You can do this systematically in some basic steps. To remove any glue around your sink area, remove the adhesive label with a blade coupled with a little force.
Another option is to use a sealant remover. This new technique makes it easy to put off the adhesive label effortlessly without using any sharp object.
After successfully removing this, you will have to clean up the other areas that contain the excess product where the sealant or glue was formerly applied. This makes it easy for you to apply a new sealant and work on this surface.
Step 2: Clean all the areas around the kitchen sink
Before starting any project around your sink area, especially sealing the kitchen sink to granite, ensure that you have your sink and the surroundings clean.
This is because the whole sink environment and the many molds and bacteria that might be present around this area may be harmful to your health. It doesn’t matter whether you recently cleaned up this environment. A quick vacuum job using mineral turps wouldn’t do any harm.
This will help you eradicate all the particles around that environment that can prevent the effectiveness of the sealant you are about to use.
These particles can make it sealing difficult. After using a cloth to clean up the liquid around the area, you can use household chemicals like chlorine bleach to wipe for extra cleaning. Be careful, use a soft brush, and wipe gently.
Step 3: Silicone sealer preparations
You have to first fill the silicone you are about to use with some drops of glycerine. Afterward, shape the nozzle to fit and close it up a few meters from the top before applying it to any surface that needs the sealant. For better results, ensure that you read the instructions in the manufacturer’s manual.
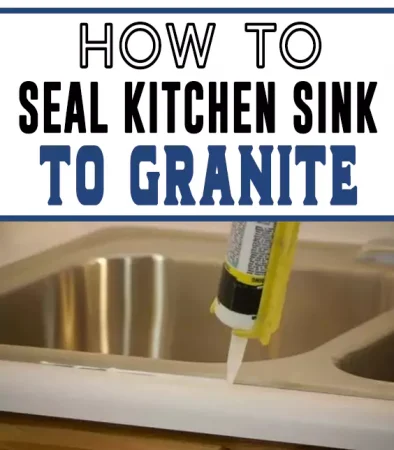
Step 4: Application of the sealant
Prepare your sealant for application on top of the surfaces around your new sink. Be sure to use pressure during application to have a very smooth layer of protection that can prevent mildew stains, moisture, or other stains that can lurk around your sink area.
Step 5: Smoothing out the sealant
After ensuring that you have adequately applied the sealant, the next thing is to smoothen it out with a damp finger.
You can use a rounded spatula as well to wipe off any excess product that is lurking around the surface. Ensure that while doing this, you are not allowing much of the product into your skin. Then, leave the surface for up to seventy-two hours.
After seventy-two hours, apply water around the pint area, but you should ensure there is no gap between the boards. A gap around the board area can invite moisture that can end up dripping through the seal and ruining it.
Step 6: Removing excess sealant
After applying the sealant, you will have some excess sealant playing around. To achieve a neat job, wipe away all the leftover sealant. You can use a silicone-based remover or a white spirit.
We recommend that you do not use these sealant removals where there is an open flame, as this is dangerous. Wait for the sealant to dry, and you are good to go afterward.
Why is sealing the kitchen sink necessary?
Whether you are just furnishing your kitchen or doing a renovation, one thing you have to do is sink caulking.
Caulking is the act of sealing the sink, and it is important because it helps keep it and the entire kitchen safe from flooding. Asides from preventing overflowing, sealing the kitchen sink also help to keep it in a fixed position.
This is best achieved with the further use of a silicone-based sealant or glue. Despite the importance of caulking, it is also necessary to fix it appropriately. To achieve this, you must ensure that the rim of your kitchen sink has a coat of caulk.
This will help bridge the gap between the countertop and the kitchen sink. It is this structure that stops the water from flowing into your kitchen.
Does silicone stick to granite?
The straightforward answer to this question is yes. Silicone caulk is mainly used for joint filling. However, specialized ones have been designed to stick to granite surfaces comfortably. These 100% silicone caulks are the best for granite.
Specialty silicones are manufactured as adhesives/glue that will work to stick silicone to granite. Silicone caulk is needed to caulk the joint between these granite transition surfaces.
Examples of these transitional surfaces include the area where the materials used as countertops meet the wall and the area where the backsplash jams the countertop.
Another option is the latex caulk. The issue with latex caulks is that they do not last long. Also, they lose their color after several uses.
How to Fix Gap between the Sink and Granite Countertop
When sealing a kitchen sink to a granite countertop, you shouldn’t overlook any small gap between a sink and granite. The reason for this gap is that sinks cannot make an airtight seal with the granite countertop. However, it doesn’t cost a fortune of time to repair them.
Caulking
The first step is to caulk this space. If the sealant is completely damaged and you need to repair it, remove and redo it.
You must apply a high-quality silicone caulk after cutting and peeling off the old one. After applying this caulk, you need to smoothen out the edges of your kitchen sink with your fingers.
Replacing the Supports
Asides from caulking and sealing, a step forward is to include the replacement of the supports that are holding the sink in place. Your sinks are held in place with the help of support clips.
If these support clips are damaged or old, they may leave a gap between your sink and the granite top. This requires that you remove the sink, do a thorough clean-up around the area, and install new supports.
What to do If Kitchen Sinks Leaking Around Edges
Step 1: Preparation
While sealing an undermount kitchen sink to granite, first put together the necessary tools you will need. The essential things you will require include a tan item or small clothing, a drain plug, a screwdriver, and a wrench. Plug the drain first and then switch off all the valves for the water supply. This will prevent any distractions and disturbance.
Also, this will ensure that no screw or sink part falls down the drain since it might not be recoverable if this happens. If the valve is not accessible, locate the pipe below your sink and follow it downwards till you see a handle or knob. Put the tap off by turning it in an anticlockwise direction. Test it by turning on the faucet.
Step 2: Dismantling
This is based on the type of fixture you are working on. The primary thing is to twist the faucet’s handle out of place.
Step 3: Repair
Find all screws and unscrew them. Afterward, replace the washer seat instead of planning to continue use. The wearing causes leakage of your tap out of the rubber material used for the rubber seat. Therefore, it is advisable to replace the rubber seat when trying to fix a leakage.
Ensure the new one you are replacing it with is the exact size. With a knife, remove the worn-out washer but ensure that you use a lubricant before fixing it there. If your faucets require certain tools, you can get a replacement kit for these specialized parts.
Step 4: Reassembling
Once the leakage of the tap has been worked on, reassemble the faucet with a screwdriver. Afterward, turn on the water supply and open the tap to test whether it has been properly fixed.
What to use to seal an undermount sink
To seal an under-mount sink, you will need a waterproof caulk. As we noted earlier, the best choice for a waterproof caulk is a 100% pure silicone caulk.
Silicone caulks are proven to stick to anything you stick them with. It is also challenging to remove after sealing.
Sealing has a time span of over ten to twenty years because of its durability. Silicone caulk is usually white and clear. Sometimes, they come in colors, perfectly matching sinks and countertops that aren’t white.
Is silicone enough to hold an under-mount sink?
The simple answer to this is yes. Silicone is more than enough to keep your under-mount sink in place. Sometimes, you get to witness that your newly installed sink started leaking a few weeks after installing it.
There are many reasons for this, and one common reason is using the wrong sealant. To ensure that your undermount kitchen sink is accurately installed, use a 100% silicone sealant.
They have good adhesive properties, and they are known for their resilient flexibility. Therefore, silicone is enough to hold your under-mount sink in place.
Can I use silicone instead of plumbers’ putty?
It is recommended that a silicone sealant be used. It is, however, not out of place to use other types of adhesives and sealants. A good example is a plumber’s putty. The one constant rule is to use an adhesive or a sealer.
A sealant is needed to prevent the leaking and dripping of water from the sink. This sealant seals the sink surface to the drain body. The only setback with plumber’s putty is that they can crack and start leaking when the clay becomes dry. However, this is the best option if you adjust and remove the drain.
Will silicone discolor granite?
Silicones can rarely scratch or discolor granite. The only thing responsible for the discoloration of a granite countertop is using chemicals when you need to remove the silicon.
Instead of using a chemical, mild soap or a liquid dishwashing soap will perfectly do. Stay clear of chemicals because they end up discoloring your granite.
What kind of silicone do you use for countertops?
The perfect type of silicone for countertops is tough, mold-resistant, watertight, and very durable silicone. It is essential to get a caulk that can provide you with all these.
These caulks can withstand extreme temperatures and prevent the growth of mold around your sink. They usually come in white and clear color.
Can you use plumbers putty on granite?
Yes, if you get the best quality plumber’s putty, they are always fit for use on granite. You can also use them on other surfaces like marble, stone, sand, quartz, plus other natural and porous materials. They hardly shrink or crack and can be cleaned up easily with no challenges. However, a silicone sealant remains the best option.
Key Takeaway
Silicone is the preferable sealant to use because there are special types that are especially easy to bond with granite. However, before you seal the sink, do not forget to remove the old sealant and clean the floor surface and the sink. Impurities and dirt will only render the sealing ineffective.
Also, remove excess sealant to leave the place as aesthetic as possible. When you’re done, don’t be in a rush to try out your work. Allow the sealant to dry and set. Finally, if you doubt your ability to carry out the sealing, call a professional.